Advanced Scripting in Core
Overview
In this tutorial, we are taking a deeper look at what it takes to utilize the Core API to create a simple multiplayer game.
- Completion Time: ~30 minutes
- Knowledge Level: None absolutely necessary, but will be easier having completed our first scripting tutorial.
- Skills you will learn:
- Downloading and editing templates
- Creating a script and using it to:
- Rotate an object
- Spawn a template/asset
- De-Spawn a template/asset
- Create an interactable event
- Create a custom property
- Update UI elements
- Using triggers
- Creating and updating trigger labels
- Creating UI elements
Core uses the Lua programming language, While this tutorial does not really require any prior knowledge of the language feel free to check out our Lua Primer to get familiar with the basics of the language.
- For debugging, we have our own script debugger, you can enable it via the View menu in the top bar of the Core editor. You can toggle breakpoints by clicking on a line number in the internal editor.
- Lastly, we have a section on code conventions that we recommend as well.
Tutorial
The first step is to use the Core API to modify objects in the world. We'll start small, with a coin the player can pick up.
Adding Manticoin
In Core, Community Content houses many assets you can use in your own games to speed up production and cut down on the amount of work required by you. One of these assets is the Manticoin, which we'll use for this project, instead of making our own coin.
To add the Manticoin template to your project, head over to the Community Content tab inside the editor. Type Manticoin into the search bar and click on the one by "Dracowolfie" All you have to do to add it to your project is to click the big blue "Import" button.
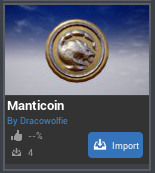
The Core editor will prompt you to save before it adds the template to your project.
Since this has been imported from Community Content, it is now listed under Imported Content in the Core Content tab. If you click the name of the Manticoin template on the left side of the Core Content window, you will see a green template icon in the space on the right. To see the Manticoin and use it, drag it to the world. Now that we have a coin in our world, our goal here is to get it to spin slowly in the air, rather than just sitting there being boring. The way to do this is--you guessed it--with a script!
SpinCoin Script
Let's make a new script using the button at the top of Core, call it SpinCoin and drag it onto the Manticoin object in our project Hierarchy so that the script is its child. You will likely need to first drag the script into the Hierarchy, and then you may try dragging it onto the blue Manticoin template.

At this point, the editor will prompt you about a networking state mismatch. In Core, non-networked objects can't be children of networked objects so we need to click the button to make all children networked to continue. Next up we will need to deinstance the template so we can move objects into it. Hit the "Deinstance and Reparent" button and watch how our script is now part of the Manticoin in the hierarchy. Now open it up and add the following line of code:
script.parent:RotateContinuous(Rotation.New(0, 0, 200))
We'll explain what this line does in a moment, but for now, make sure your Manticoin object looks similar to the following:
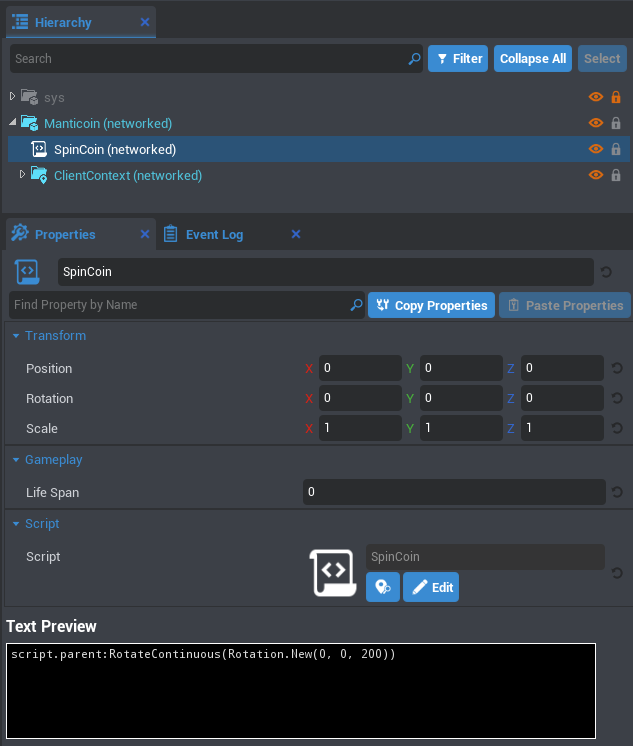
Running this should continuously rotate the coin in the air. Shiny!
If your coin is halfway into the ground, select the Manticoin template and drag it upwards in the world--or to wherever you like!
Okay, so what did we just do?
Spin Breakdown
script-> references the script object, i.e. the asset you dragged into the Hierarchy.script.parent-> references the script's parent object, i.e. the item one level above the script in the Hierarchy (in this case, the Manticoin object).RotateContinuous()-> Every CoreObject (things like scripts, objects, etc.) has methods available to it.RotateContinuousis one of these, and we invoke such a function with the:syntax. It requires aRotationparameter to work.- Methods are simply functions that belong to an object.
Rotation.New(Number x, Number y, Number z)l)-> Here, we create a vector to rotate the object on the z axis by 200, spinning the coin along the z axis by the requisite speed.Rotationis a Core Class that has the method.New, which takes in parameters for the x, y, and z..Newreturns aRotation, which is exactly what we need to pass in toRotateContinuous(). How convenient!
If you want to know which other methods are available for every object, check out our API docs page.
Spin Cleanup
Writing all that in one line of code makes it a bit confusing, so let's rewrite it to be more clear.
-- Get the object one level above the script in the hierarchy, in this case our coin
local coin = script.parent

-- Create a rotation along the z axis
local spinRotation = Rotation.New(0, 0, 200)

-- Rotate the coin using our previously defined rotation
coin:RotateContinuous(spinRotation)
Yay, we've got it working! Now if only we could collect these coins...
Picking Up Coins
Adding a Trigger
- From Core Content -> Gameplay Objects, drag a Trigger object into the world.
- Resize the trigger to match the coin's size.
- Select the Trigger in the hierarchy and press R to change to scale mode. Drag the handles to adjust the scale.
- Press V to toggle Gizmo visibility, including the Trigger's hitbox.
- Parent the Manticoin under the trigger by dragging Manticoin onto the Trigger in the hierarchy.
- Press W to change to Translation mode. Drag the upward handle to move the trigger (along with its children) higher together.
- While still in Translation mode, move the trigger (and therefore the Manticoin) somewhere else on the map. This way our default spawn point isn't overlapping the Manticoin! Otherwise we would pick it up instantly when pressing Play.
- Resize the trigger to match the coin's size.
Handling Triggers
Let's make a script called PickupCoin and drag it into the Hierarchy to place it as a child of the trigger.
-- When a player hits the coin, increment a resource on the player and remove the coin
function handleOverlap(trigger, object)
    if object ~= nil and object:IsA("Player") then
        object:AddResource("Manticoin", 1)
        trigger:Destroy()
    end
end
This function takes in the trigger that was activated and the object that collided with it as parameters. We first check to make sure that the object is not nil (this is checking if the object exists) and that it is a Player. If it is a Player, we add a Resource to it. In our case, we simply increase the amount of the "Manticoin" resources on the player by one. Finally, we use :Destroy() to remove the trigger (and all its children) from the game.
Now we need to attach our new handleOverlap function to the trigger.
-- Whenever an object collides with the trigger, run this function
script.parent.beginOverlapEvent:Connect(handleOverlap)
beginOverlapEvent is a default event that exists within trigger objects. By using :Connect() in the code above, we are able to let the event know about the function to call, in this case handleOverlap, when the event gets executed.
Lastly, we need to enable networking on the trigger. To do that, right click on it in the hierarchy, select "Enable Networking" and confirm. This enables interaction between the player on their client and the coin on the server.
If you now save and press play, you'll notice that while the coin disappears on contact, nothing else seems to happen. This is because we aren't displaying the other part of the code, the currency change, to the player.
Displaying Coin Count
Create a new script and call it DisplayCoins. We'll start with the following code:
-- Print out 'Player name: {coin count}' every 2 seconds
function Tick()
    Task.Wait(2)
    local players = Game.GetPlayers()
    local numPlayers = #players
    for i = 1, numPlayers do
        local numCoins = players[i]:GetResource("Manticoin")
        UI.PrintToScreen(players[i].name..": "..tostring(numCoins or 0))
    end
end
Don't forget to drag your script into the Hierarchy--then press play to check it out!
The function Tick() is built into Core and loops constantly while a game is running. We are slowing this down with the Task.Wait(2) line, as the function will pause there for 2 seconds before continuing the code. We are then getting all the players in the game with Game.GetPlayers(), and counting how many there are with the # symbol. Then for each player, we are displaying their personal Manticoin count alongside their username.
Now when you walk over the coin, you'll pick it up, and the amount will be displayed every 2 seconds. The for loop will show the score of each Player, since Core comes equipped with multiplayer functionality right out of the box.
Next up, we're going to add a UI element to display this information instead of the bland UI.PrintToScreen call we have now.
Using UI Objects
UI Objects are 2D elements that can be used to show the Heads Up Displays (often abbreviated to HUD), which are buttons, images, and messages to the player. We can leverage these instead of UI.PrintToScreen to have more control over what the user sees.
Creating UI Text
- Let's play around and make our game more attractive! In order to use UI elements, we need a UI Container.
- Go to Core Content -> UI Elements and drag the UI Container object in to the hierarchy.
- Right click on this UI Container in the Hierarchy, hover over Create Network Context and create a Client Context. This creates a Client Context folder as a child of the UI Container.
- From Core Content -> UI Elements pick the UI Text Box element and drag it onto Client Context in the hierarchy, this will make it a child of it.
- Rename the Text Control to
CoinUI. - In the properties panel, set
Textto be blank by default by deleting the existing text that is already there.
Info
While visually similar in the Hierarchy, Client Context is different from a folder - the easiest way to think about it is that its contents will be unique to each player's client (or computer). In other words, the server doesn't care about it.
Updating UI Text
Now let's go back to our DisplayCoins script and replace the code with the following:
-- Display the player's coin amount

Task.Wait()  -- Wait a tick for players to connect
local player = Game.GetLocalPlayer()

-- Every 0.1 seconds update the coin count display
function Tick()
    Task.Wait(0.1)
    local score = player:GetResource("Manticoin")
    local displayString = player.name..": "..tostring(score or 0)
    script.parent.text = displayString
end
Info
Calling Task.Wait() without sending in an argument will default to 1, a single tick. It supports float arguments and yields the Task for that many seconds.
Note: For better performance we'd ideally write code that only updates the UI when the coin count changes, but this example favors using simple code over robust systems.
So now instead of constantly getting the players in-game and looping through them, we are only updating the on-screen UI for the local player. This way it displays uniquely for each person, as both the UI and this script will run from a Client Context.
Next, let's place the script DisplayCoins as a child of the Text Box. In this script, we set a variable score to the player's amount of Manticoin currency every 0.1 seconds. With script.parent.text, we access the text from the parent Text Control. Lastly, we overwrite the text appropriately with the player's name and score.
The folder structure at this point should look like this:
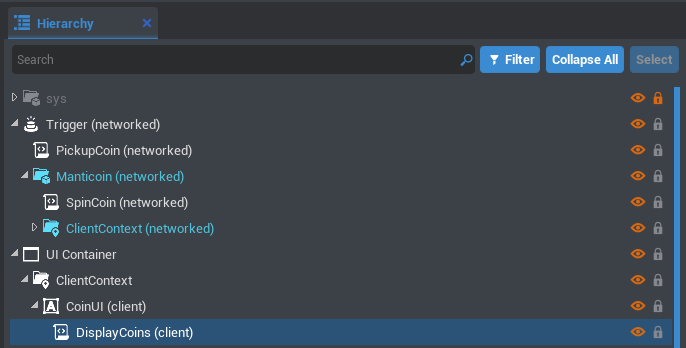
Your Text Box probably came with another UI Container, but as this is already a child of a UI Container, we don't need both. Drag the CoinUI one level higher to just be a child of the Client Context folder. Then you can delete the extra UI Container.
Tip
All UI Elements come with a UI Container automatically to help you use them more immediately.
Feel free to play around and customize how the Text Control looks and where it is displayed on the screen. Using UI is a fantastic way to give your game a unique and professional feel. For more information about UI, here is a cool reference to check out.
Now let's make a simple map and populate it with coins.
Setting up the Map
So far, we've worked on Objects, Triggers, and UI. Let's switch gears and spice up our map a bit!
-
Move the player's spawn point
- When you create a new project, you will have these objects in your Hierarchy by default:
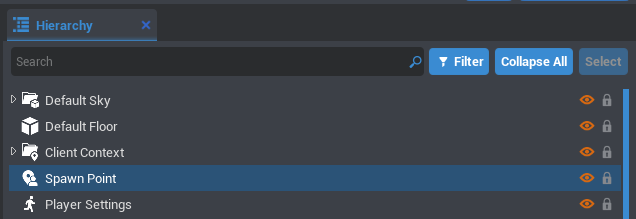
-
This is everything you that see in the viewport. The sky, floor, and the basics for a game: a camera, the spawn point, and the player's settings.
-
Move the spawn point object around wherever you'd like in the world.
-
If you can't see the spawn point, remember you can toggle gizmo visibility by pressing V.
Alright, awesome!
Win State
Generating Coins
Okay, now to populate the map with coins. Right-click within the Hierarchy to make a folder called Coins. Now drag our Trigger with the attached Manticoin object into it.
Press CTRL + W to duplicate it how many times you like.
Organization is important in your hierarchy. You can put objects together via folders or grouping!
Note
Folders and groups are very similar, but have one huge distinction: folders treat their children as independent objects, whereas a group will treat them as part of a larger whole. Trying to select a single object in a group will select the entire group, causing all items in the group to be modified by any changes you make.
Now we will write a script to make the game round-based.
Game Logic Script
Here we go! Create a script called CoinGameLogic.
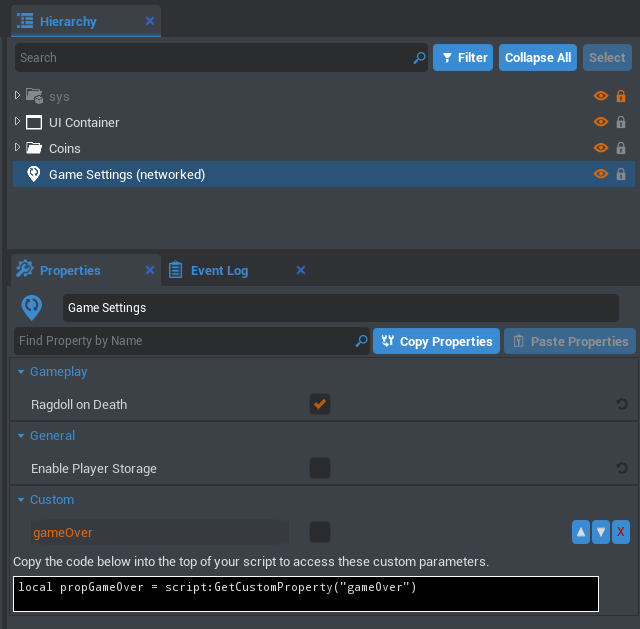
Let's also add a Game Settings object to our hierarchy from Core Content -> Settings Objects. We will use it to hold our game state info. To let us communicate between the server and client, we will have to set it as "networked" via the right click settings menu as well.
Next, we need to create the custom parameter to save our game state.
- To create a parameter for
Game Settings:- Select the
Game Settingsobject in the hierarchy. - Click the "Add Custom Property" button and select
Booleanas the type, now put ingameOveras the name. - Right click the property and click "Enable Property networking".
- Select the
Here's the entire Hierarchy at this point:
Let's open up that script we created called CoinGameLogic and add the following code:
-- Get the folder containing all the coin objects
local coinFolder = World.FindObjectByName("Coins")

-- Every second check for how many coins are left in the scene
function Tick()
    Task.Wait(1)
    local coinsLeft = #coinFolder:GetChildren()
    if coinsLeft == 0 then
        World.FindObjectByName("Gameplay Settings"):SetNetworkedCustomProperty("gameOver", true)
    end
end
Make sure it's in your project Hierarchy, and check it out!
World.FindObjectByName() searches the Hierarchy for the object with the name passed in. The first time we use it to find coinFolder. We then look at how many coins are left by seeing how full the folder of coins in the hierarchy is (:GetChildren() returns the child elements, and # checks the length of the array, which is the number of objects the folder contains). Make sure to add the CoinGameLogic script to your project Hierarchy.
When there are zero coins left, we find the Gameplay Settings and set the value of gameOver to true. This way, all the players' clients will be able to know when the game is finished.
So far, nothing actually happens--but that's next!
Victory UI
We are going to update the game when all the possible coins are picked up. First, we'll need a new UI Text Box which we'll name VictoryUI which will only show up when the game is over, alerting the players that all coins have been collected. After designing the victory UI, we'll want to hide it until it's the appropriate time.
-
Create a UI Text Box named
VictoryUIas a child of theUI Containerwe made earlier underClient Context.Tip
You could duplicate the
CoinUIfrom earlier. WithCoinUIselected in your Hierarchy, press CTRL + W to duplicate it. You'll want to delete the extra DisplayCoins script that will be a child of your new clone. -
In the
textfield in the Properties window, type "All coins found!". - Customize your font color, size, and justification--do what you like with it!
- Once you're satisfied, change the visibility of the Victory UI under Properties -> Scene -> Visibility to Force Off.
Now, let's make a script called DisplayUI that makes the victory UI visible at the end of the game! We will parent this script underneath VictoryUI.
Next, we have to hook up our UI to the Game Settings that knows if the game is over or not.
- Select our
DisplayUIscript in the hierarchy. - With that still selected, drag your
Game Settingsfrom the hierarchy to the Properties window of theDisplayUIscript. This will automatically add a reference to the Game Settings object as a custom property on theDisplayUIscript!
After that is done, open up the DisplayUI script and add the following:
local ui = script.parent
local settings = script:GetCustomProperty("GameSettings"):WaitForObject()

local function OnChanged(settings, key)
    gameOver = settings:GetCustomProperty("gameOver")
    if gameOver == true then
        ui.visibility = Visibility.INHERIT
    else
        ui.visibility = Visibility.FORCE_OFF
    end
end

settings.networkedPropertyChangedEvent:Connect(OnChanged)
This will toggle the visibility property of VictoryUI based on the current state of the game, determined by our Game Settings.
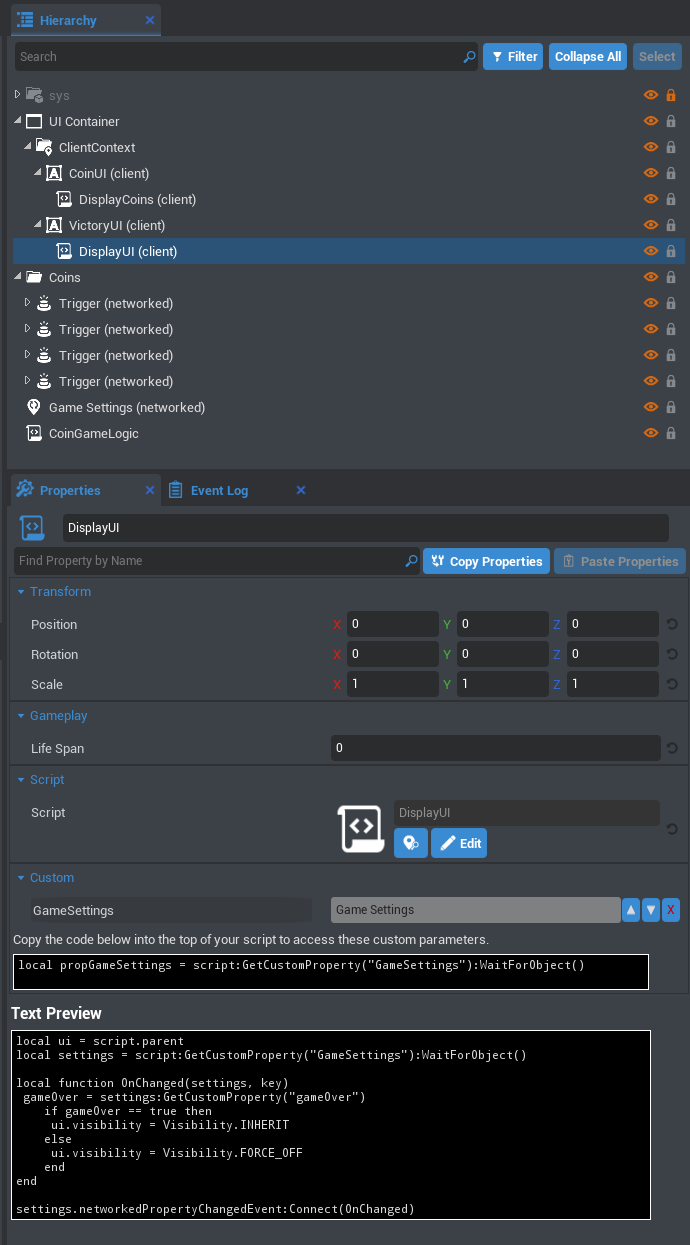
Your Hierarchy should look like the above now!
If you press play and collect all the coins in the scene, your victory UI should now appear.
Reset
Lastly, let's add in the logic to reset the map (as in to add the coins back) after they all have been picked up.
Currently we are deleting the coins when they are picked up. We could spawn in new coins at the old locations, but that would involve storing references to the old locations. Sometimes you need to rewrite code as your game changes, and that's exactly what we're going to do here!
An easier solution would be to just hide the coins from the map when they are picked up, and then un-hide them when resetting the map. Fortunately, this is not only a simple thing to do in Core, but also a very quick change.
Resetting Coins
Open up the PickupCoin script and change the line trigger:Destroy() to trigger.isEnabled = false. This will make it so that when we collide, instead of destroying the Manticoin, it disables it. Disabling an object makes it basically not present in the scene. The two biggest things for us is that it disables the collision and visibility, so players won't be able to collide with it or see it after it's been collected.
Next, create a new UI Text Box element to display information when the round resets. We'll call it RoundUI and make it a sibling to CoinUI, by also setting it as a child of your Client Context. Like CoinUI, we'll set the Text property to be blank by default.
The last step is to add the resetting logic to our main CoinGameLogic script. For us, resetting the map means looping through all the coins and setting their .isEnabled property to be true. The logic will be quite similar to getting the coin count. So to do what we just described, place the following code below the Tick() function:
function ResetMap()
    -- Set all coins to be enabled
    for _, coin in pairs(coinFolder:GetChildren()) do
        if coin ~= nil then
            coin.isEnabled = true
        end
    end

    -- Reset rources for every player
    local players = Game.GetPlayers()
    for _, player in pairs(players) do
        player:SetResource("Manticoin", 0)
    end
end
Updating Coins Left Detection
You might notice that our old code for checking the number of coins left won't work anymore, as we are now setting a property on each of the coins (.isEnabled) rather than deleting the object entirely. Add the following function to CoinGameLogic:
-- Get the amount of coins that are enabled in the scene
function GetCoinsLeft()
    local count = 0
    for _, coin in pairs(coinFolder:GetChildren()) do
        if coin ~= nil and coin.isEnabled then
            count = count + 1
        end
    end
    return count
end
This function will return how many coins are left. All that's left to do is to add these function calls to our main tick loop and update the UI, and we'll be done!
Connecting all the Reset Code
We're almost there! Replace the current Tick() function you have with the following:
-- Check the number of enabled coins
-- If the game should end, send a message through the Gameplay Settings
-- Cue a new round to start
-- Reset the coins and UI

function Tick()
    Task.Wait(1)
    local coinsLeft = GetCoinsLeft()
    if coinsLeft == 0 then
        World.FindObjectByName("Game Settings"):SetNetworkedCustomProperty("gameOver", true)
        for i = 3, 0, -1 do
            Task.Wait(1)
            roundUI = World.FindObjectByName("RoundUI")
            roundUI.text = "New round in "..tostring(i).." seconds"
        end
        World.FindObjectByName("Game Settings"):SetNetworkedCustomProperty("gameOver", false)
        roundUI.text = ""
        ResetMap()
    end
end
Now we've connected all the functions we just wrote, and we're passing information to that RoundUI we created. We've got a cool message that alerts players to when the game is starting over! When all the coins are disabled, this code will loop through changing the message text every second until everything resets.
Ahhh, the magic of programming!
Summary
In just a few steps, you've created your first multiplayer game in Core by using simple editor operations and a bit of Lua scripting. You're now able to publish your game and share it with your friends!
Try changing the art of this to something else, or go more complex with map layouts--let your mind wander through different ideas as they come!
Was this page helpful? Can it be improved? Please let us know your feedback!