Scripting in Core
Overview
In the first part of this tutorial, we are going to introduce you to the very basics of scripting in Core. A tradition among programming tutorials is doing that in the form of a "Hello World" script.
For the second part, we are going to teach you how to take an existing template in Core and enhance it with your scripts you write yourself.
This tutorial is designed for creators who have never done any programming before! So, if you're totally new to this all but want to give it a try--give this a go!
- Completion Time: ~25 minutes
- Knowledge Level: No prior knowledge of Lua or any programming language. If you are already familiar with programming, you might want to skip this and check out Advanced Scripting in Core, the Lua Primer or Advanced Abilities in Core.
- Skills you will learn:
- Downloading and editing templates
- Creating a script and using it to:
- Rotate an object
- Create an interactable event
- Create a custom property
- Using triggers
- Creating and updating trigger labels
Core uses the Lua programming language, While this tutorial does not really require any prior knowledge of the language feel free to check out our Lua Primer to get familiar with the basics of the language.
-
For debugging code, we have our own script debugger, you can enable it via the View menu. You can toggle breakpoints by clicking on a line number in the internal editor.
-
Another page you'll probably be constantly checking is the Core API page.
-
Lastly, we have a section on code conventions as well.
My First Script
Creating the Script
-
Open up the editor and click the "Create Script" button in the toolbar at the top left of the editor.

- Name it
TutorialScriptfor now.
Tip
You can rename scripts by clicking on the name of the script (or by pressing F2) when it is selected.
- Name it
-
Open up the script by double clicking on it.
- By default this will open up the script in our in-built editor.
Info
You can also configure scripts to open in an external editor by default by going to
Edit -> Preferences -> External Script Editor.We offer editor integrations for Atom and Visual Studio VS Code that add autocomplete for the Core API support!
Writing the Script
-
Type the text below into your empty script:
UI.PrintToScreen("Hello World!") -
Save the script by pressing CTRL + S on your keyboard.
Running the Script
Now we have created a simple script! However, we need to actually add it to our game for it to do the code we wrote.
-
To add your script to the game, drag it from the My Scripts area of the Project Content tab to the top of the Hierarchy tab on the right side.
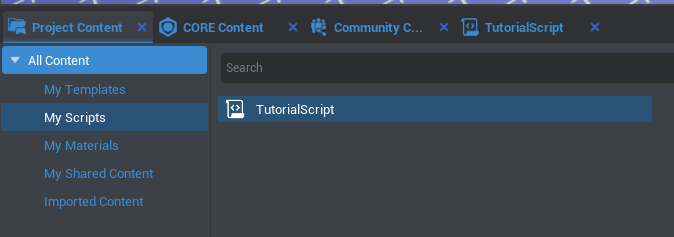
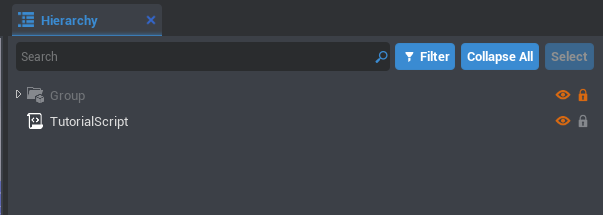
Info
If any of these windows are missing or you accidentally close one, you can open any window again from within the View menu at the very top left of the Core editor.
-
Press Play at the top of the editor, and see your message appear on screen in the top left!

Hello World Breakdown
- We made a script.
- We populated it with code.
- The function
UI.PrintToScreen(string)prints the parameterstringto the viewport. This is one of many of the built-in Core API functions.
- The function
- We placed the script into the Hierarchy tree so that it executes when the game runs.
Next step: Adding our own function!
Functions
In programming, a function is a named section of a script that performs a specific task. In this sense, a function is a type of procedure or routine.
You could think of it in terms of sandwich making. For a task like slicing an ingredient, you would type out steps like:
- locate cutting board
- grab knife
- hold object to cut properly
- begin slicing
But for each item you want to slice for the sandwich, you'd have to type out that whole list each time! That would mean so much typing for the tomates, cheese, pickles... If that were a function instead, then you could just type SliceObject(tomato) when you want to do all those steps at once.
So in order to be able to perform our task exactly when and how we want to, we're going to change TutorialScript so the UI.PrintToScreen call is within a function. We'll call this function Init.
-
Open up your
TutorialScriptagain if you closed it. -
Replace your existing code with this:
-- Our first function!
local function Init()
    UI.PrintToScreen("Hello from a function!")
end
Note
In case you've not read the Lua Primer, putting
--at the beginning of a line makes that line a comment, which is a line of code that isn't read by the computer. You don't have to include these lines, since they're just for leaving notes in your code for yourself and other humans. -
If you save and run this code, nothing will happen. How utterly boring! This is because the function is never actually called to run in our code. To get our function to work, add a function call to the end of the script.
-- Calling the function
Init()
Your entire script should now look like this:
-- Our first function!
local function Init()
    UI.PrintToScreen("Hello from a function!")
end

-- Calling the function
Init()
Now if you save and run this, you'll see your message appear on the screen! Excellent.
Note
Lua requires functions to be declared before they're called. In this tutorial, we'll make sure to keep all our function declarations at the top of scripts.
If you are having issues, check to see if your TutorialScript looks like this in the Properties view:
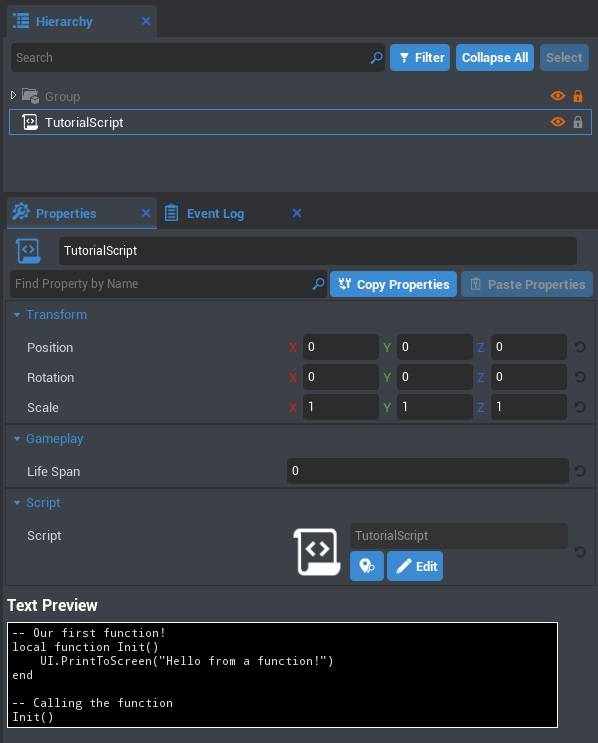
Hello World Function Breakdown
- We changed our code to a function.
- We called the function we wrote so that it may run.
- We learned what comments are and used them for each section.
You can now delete the TutorialScript from your project Hierarchy, as we aren't going to use it for the next portion.
Time to put what we've learned to a test; welcome to the main course!
Tutorial
We are going to create something that brightens every room: a light switch!
This involves turning on and off a light switch to illuminate a light bulb.

Downloading the Template
-
Look for the Community Content tab in the Core Editor. In here, search for "switch".
-
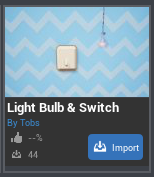
Download the template Light Bulb & Switch (by Tobs) by clicking on the blue Import button on the template.
-
Now click over to the Imported Content section of the Core Content tab.
Double-click the gray stack of three boxes icon for Light Bulb & Switch, or click the Light Bulb & Switch in the left listed menu under Imported Content. Both of these actions get you to the actual template--the green cube with a ring around it. This is what we drag into the game!
-
Click on the Light Bulb & Switch package and drag it into your game by either dragging it into the viewport or the Hierarchy tab.
You're probably going to want to move the template around and rotate it to be able to see it better.
Tip
If you want help or tips on moving things around in Core, check out the Art in Core page.

 Left: halfway through the ground, in the shade - hard to see. Right: Well lit and constructed - good to go!
Creating a New Script
-
To get started making this light switch work, we're going to create a new script by clicking that "Create Script" button in the toolbar at the top of the editor.

-
Name this script
LightToggleScript. -
Save the script by pressing CTRL + S.
Info
It's important to save your scripts often so you don't lose work in the event of a problem. Scripts don't update in-game until you save them, so you won't see any of your new code in action until you save. You cannot save a script while the game is running.
-
In order to make changes to the template, we first need to deinstance it. Right click on the Light Switch & Bulb template in the Hierarchy and select "Deinstance This Object" from the drop down menu.

The template and objects in the template will change from blue to teal. This color change means that the template is now editable.

Teal objects are part of a template that's been deinstanced - which means you can edit them and move them around in the Hierarchy.
-
Open the contents of the Light bulb & switch template by clicking the little drop down arrow to the left of it in the Hierarchy. Open up the Light switch folder inside the same way.
-
Drag the
LightToggleScriptthat we made from the Project Content tab into the "Switch" folder within the "Light switch" folder of the template.Core will ask you if you want to make the script networked. Click the "Make Children Networked" button so that it will be networked along with the other objects in that folder.
Info
Any time scripting is used to cause change to an object, that object must have networking enabled or be in a Client Context. Without networking, changes will not happen on all player's screens--a must for multiplayer games!
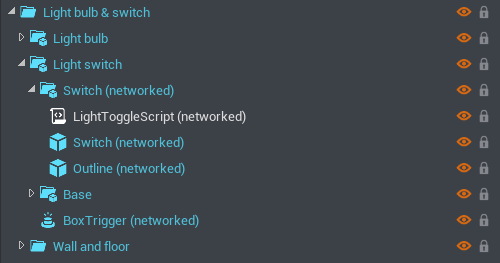
Make sure the script is first in the "Switch" folder's hierarchy. This makes it easier to find when looking at the Hierarchy. All together your template hierarchy should look like this now:
Defining the Switch
We want our light switch to function just like it would in real life: the switch will point up or down depending on whether the light is turned on or off.
First you'll need to tell the script which object in the scene is the switch, so that it knows what to rotate. You will create a variable that defines what the switch is. It's best practice to define your variables at the beginning of your scripts.
Note
In this tutorial we will use several different ways to access other objects in the Hierarchy. In your future as a creator, use whichever methods feel easiest to you!
-
Type the following into Line 1 of
LightToggleScript:local switch = script.parentlocaltells the script that the following variable should only be accessible from this script rather than being accessible from external scripts, or globally.switchis our variable name. We can name it anything but it's important to create variables with self-explanatory names so our scripts are easy to read and understand.script.parentrefers to the script's parent - the group or folder the script is placed in. In this case it refers to the Switch group. If we wanted to refer to the entire Light Switch & Bulb template we would usescript.parent.parent.parent.So, all in all,
local switch = script.parenttells the script we are defining a local variable namedswitchand what object in the hierarchy our new variable corresponds to.
Rotating the Switch
-
We now need to rotate the switch. On a new line, type:
switch:RotateTo(Rotation.New(0, 90, 0), 2)switchtells the script to rotate the object attached to this variable.RotateTois an function that tells Core we want to rotate an object.Rotation.Newmeans we are telling the script to rotate our object to a new set of coordinates. You will almost always useRotation.Newwhen rotating an object, but when applicable you can useRotation.ZEROwhich will rotate the object to0, 0, 0.(0, 90, 0)are the x, y, and z coordinates (respectively) of where we want our switch to rotate to. We want to rotate our switch up along the y-axis by 90 degrees.2is the animation duration in seconds.
Our script should now look like this:
local switch = script.parent

switch:RotateTo(Rotation.New(0, 90, 0), 2)
Let's press Play and see how our switch moves!

Unfortunately that didn't quite work out the way we wanted… Depending on where in the scene you placed your light switch, it might look like the above animation, where the switch rotated sideways instead of up. That's because we didn't take into account the switch's initial rotation in the scene.
We want the script to rotate our switch 90 degrees up. But our problem is that the script is rotating the switch globally while we want to rotate it locally; it's changing the switch's global rotation from
(0, 0, 180)to(0, 90, 0). In order to get the script to rotate the switch the way we want, only along the y-axis, it needs to know to move only relative to its original position. -
Luckily in this case the
RotateTo()function has an optional parameter that we can add to specify that we want the rotation to happen relative to its own space.switch:RotateTo(Rotation.New(0, 90, 0), 2, true)By adding
trueto the end of the parameters forRotateTo(), it moves in local space. If we were to enterfalseinstead, or enter nothing like we did the first time, it will move in world space. World space is relative to nothing but the world itself, as if it was at the root of the Hierarchy. -
Press Play and test it out!

Success!
Using a Trigger
We want the player to be able to flip the switch to turn on and off our light. To do this we need a trigger. A trigger defines the area an interaction can take place in. This sounds pretty abstract, but will be clear once we start using one.
-
Our template already includes a trigger inside of it for us to use, but trigger objects can be found in the Core Content tab. Scrolling down to Gameplay Objects will show the section with "Trigger" type objects.

-
Let's find the trigger already in our template. In the Hierarchy tab, select the "BoxTrigger" object within the Light switch folder. and press F. This will find the trigger in our viewport. If you can't see the trigger, press V to enable Gizmo visibility.
Gizmos are outlines that are displayed over objects that are otherwise hard to see, such as triggers, decals, and lights.
-
Notice the size, shape, and position of the trigger. Where and how a trigger is located determines how close a player needs to be to interact with the trigger, as the player will simply have to stand inside the box to be able to activate the trigger.

This size will work fine for this purpose.
-
Look at the Properties of the trigger by selecting it within the Hierarchy. Under the "Gameplay" section there is an option called "Interactable." Check the box next to it to enable it.
This way, it will ask us if we want to interact with it in-game, and a player must press a button to cause the interaction. If the Interactable option is off, then the player walking into the trigger will cause the interaction to happen instantly rather than at a button press.

-
Now that we know what a trigger is and where it is set up, we can get back to our script. We need to tell the script what our trigger is and what should happen when the player interacts with it.
So now, under our
switchvariable but above ourRotateTo()function, add this line of code:local switchTrigger = switch.parent:GetChildren()[3]switchTriggeris the name for our trigger variable.script.parent:GetChildren()[3]defines the object we are using as our trigger - the third child of the switch's parent group.

Your script should look like this:
local switch = script.parent local switchTrigger = switch.parent:GetChildren()[3] switch:RotateTo(Rotation.New(0, 90, 0), 2,true) -
Now that the script knows which object we are using as a trigger, we need to define what happens when we interact with the trigger.
After your rotation statement, type:
local function OnSwitchInteraction() end- A
functionis a set of actions that the script carries out every time the function is referenced in the script. OnSwitchInteractionis the name of our function.endtells the script the function is over.
This function will define what happens when the player interacts with the trigger.
Eventually we want the switch to flip up and down when the player interacts with it, turning the light on and off. For now we'll just place our rotate statement inside it, which is just the switch turning down.
- A
-
Cut and paste the rotation statement from line 5 into our
onInteractionfunction. It should now look like this:local switch = script.parent local switchTrigger = switch.parent:GetChildren()[3] local function OnSwitchInteraction() switch:RotateTo(Rotation.New(0, 90, 0), 2, true) end -
Lastly, you'll need an event statement that tells the script to actually do the
OnSwitchInteractionfunction when the player interacts with the trigger. At the end of your script type:switchTrigger.interactedEvent:Connect(OnSwitchInteraction)switchTriggeris the name of our trigger.interactedEvent:Connect()tells the script every time the player interacts with trigger to execute the function passed to theConnect()function.OnSwitchInteractionis the name of the function we are connecting.
Without this statement the script wouldn't know to call the
OnSwitchInteractionfunction when the player interacts with the trigger.Our script should now look like this:
local switch = script.parent local switchTrigger = switch.parent:GetChildren()[3] local function OnSwitchInteraction() switch:RotateTo(Rotation.New(0, 90, 0), 2, true) end -- Connect our event to the trigger switchTrigger.interactedEvent:Connect(OnSwitchInteraction) -
Press Play and see if our trigger is working properly.
Perfect! When the player presses F to interact with the trigger, our switch rotates up!
-
Let's speed up the switch's rotation animation now that we have the rotation and trigger working. Change the
2in theRotateTo()statement to0.5. Now the switch will complete its rotation in 0.5 seconds.switch:RotateTo(Rotation.New(0, 90, 0), .5, true)Best Practices: Organizing your code
It is important to keep your code organized so it is easily read and understood. You might come back to your project after not working on it for a while, or you might be collaborating with other people; in both cases it is nice to have an explanation of what your functions do. It can also make finding specific functions in your script easier.
Programmers use comments to define and explain certain parts of their code. See the example below for how you might comment on our current script.
    local switch = script.parent
    local switchTrigger = switch.parent:GetChildren()[3]

    -- Rotate the switch when the player interacts with switchTrigger
    local function OnSwitchInteraction()
        switch:RotateTo(Rotation.New(0, 90, 0), .5, true)
    end

    -- Connect our event to the trigger
    switchTrigger.interactedEvent:Connect(OnSwitchInteraction)
At Core, we have our own set of coding conventions which you can read about here.
As our script gets longer, these practices will make our script easier to read and edit.
Spawning a Light
-
Let's make our light switch a little more functional and have it spawn a light when we interact with the switch.
Select the Lighting category in the Core Content tab. Any of the lights can be used for this tutorial, but let's use the Point Light. Drag the light into your Hierarchy, then adjust the way the light looks by editting its settings in the Properties tab.
To see this whole list of options, turn on the Advanced Settings.
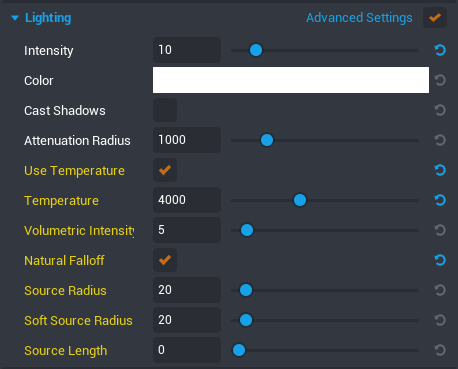
I chose to turn down the light's Intensity because it was very bright in my scene. I also turned Use Temperature on and lowered the number to give the light a soft warm color.
-
When you're done making adjustments, right click on the Point Light in the Hierarchy and select "Enable Networking" under the Networking section.
Anytime a script interacts with an object or asset the object needs to be networked.
-
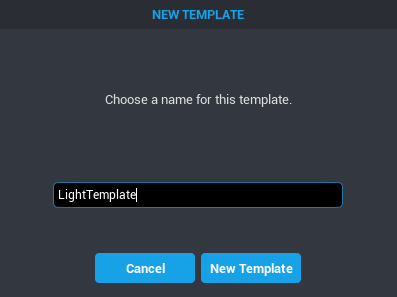
Right click on the Point Light in your Hierarchy and select "Create New Template from This" under Templates in the menu. Let's call our new template "LightTemplate".
-
Delete the LightTemplate from the Hierarchy. We don't want the light in our scene until we turn on the light switch.
-
Click on our script
LightToggleScriptin the Hierarchy and look at the Properties tab. Look in your Project Content window for the LightTemplate that we just made.So with the Properties of the
LightToggleScriptopen, drag the LightTemplate from Project Content into the Properties window of theLightToggleScript. This will add the template as a custom property to our script so that we can easily access it!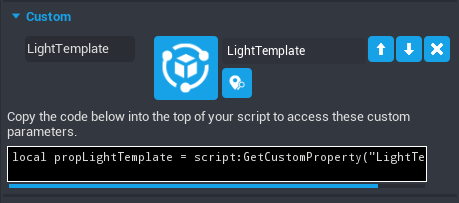
You could also do this same thing by clicking the Add Custom Property button at the bottom of the Properties window, and selecting the type "Asset Reference". Then drag your template from Project Content into the new custom property.

Congrats! You just added your first custom property to a script.
-
Now we need to tell the script how to find our light template and to spawn it whenever the player turns on the light.
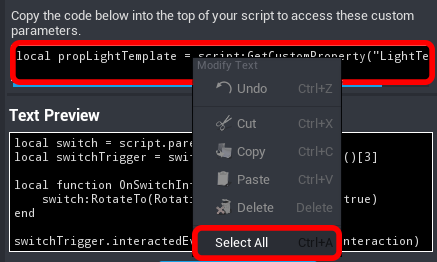
First, we add a new variable to our
LightToggleScript. When you make custom properties, Core generates a small script of all those variable references in Lua. To copy those into our script real quick, right click into that black box and select all & copy it into the top of our script.local propLightTemplate = script:GetCustomProperty("LightTemplate")propLightTemplateis the name of our variable. Remember we want to keep our names straightforward. Because we will be using this variable to spawn template we just made, we're going to call itproplightTemplate.script:GetCustomProperty("LightTemplate")tells the script to look for our scripts custom property called "LightTemplate" which references ourLightTemplateobject in Project Content.
-
Now we need to tell the script to spawn
lightTemplatewhen the player interacts with the switch and where to spawn it.In our
OnSwitchInteraction()function under ourRotateTo()statement, type:World.SpawnAsset(propLightTemplate, {position=Vector3.New(0, 0, 0)})Worldis a collection of functions for finding objects in the world.SpawnAssetis a function that tells the script we'll be spawning a template or asset, and where to do so.propLightTemplateis the variable we'll be spawning. Because we already defined the variablelightTemplate, the script knows to spawn the template attached to the script's custom property "Light".Vector3.New(0, 0, 0)tells the function where in the scene the script will spawn our template. Currently the script will place our light template at coordinates "0 0 0". We will need to change this part to spawn the light in our light bulb, but for now let's check to see if our new lines of code work.
Your script should now look like this:
local switch = script.parent
local switchTrigger = switch.parent:GetChildren()[3]
local propLightTemplate = script:GetCustomProperty("LightTemplate")

-- Rotate the switch and spawn a light
-- when the player interacts with switchTrigger
local function OnSwitchInteraction()
    switch:RotateTo(Rotation.New(0, 90, 0), .5, true)
    World.SpawnAsset(propLightTemplate, {position=Vector3.New(0, 0, 0)})
end

-- Connect our event to the trigger
switchTrigger.interactedEvent:Connect(OnSwitchInteraction)
Notice how we updated the comment describing what our
OnSwitchInteractionfunction does. -
Press Play and interact with the switch. Now press TAB to pause gameplay and look in the Hierarchy. You should see "LightTemplate" at the bottom of the Hierarchy. Depending on where you are in the scene, you may even be able to see the light, which spawned at coordinates "0 0 0".
-
Time to change the spawn location to the light bulb.
Click on and open the Light bulb group in the Hierarchy. See the group named "Filaments"? As this group is located in the center of the bulb, it would be the perfect location for our light to spawn at.
We could look up the global position of the Filaments and plug them into our code, but that would mean if we ever moved the light bulb we would have to go into our script and update it - which we might forget to do, resulting in a random floating light in our game.
Instead we can find the filaments' position in the script and use that, which is a lot easier in the long run as we'll be able to move the light bulb anywhere we want without worrying about updating the script every time.
Let's start with the variables:
local filaments = World.FindObjectByName("Filaments") local bulbPosition = filaments:GetWorldPosition()-
filamentsis the name of our variable defining which objects are the filaments in our scene. -
FindObjectByNameis a Core function to find objects you wish to reference. Very handy if they are nested deep within many groups and folders. We could have defined filaments as:local lightBulbFolder = script.parent.parent:GetChildren()[1] local filaments = lightBulbFolder:GetChildren()[1] local bulbPosition = filaments:GetWorldPosition()but
FindObjectByNamedoes the same thing with less lines of code.Tip
In this tutorial we have been showing you many ways of referencing objects: cutom properties,
GetChildren(),FindObjectByName()--use whichever you like best and suits your needs at the time. -
Filamentsis the name of the object in the hierarchy we want to reference. If you have many objects in your game named the same thing, the script will use the first one it finds. If we made a copy of the filaments group in the same folder, the script would use whichever one comes first in the hierarchy (i.e. the first child of the folder will be chosen over the second child, how mean.). -
bulbPositionis the name of our variable defining where we want the light placed. -
filaments:GetWorldPosition()gets the coordinates of our filament object.
-
-
We now need to update our
SpawnAssetfunction to spawn the light wherever the Filaments are. Find ourSpawnAssetfunction and changeVector3.New(0, 0, 0)tobulbPosition. Our script should now look like this:local switch = script.parent local switchTrigger = switch.parent:GetChildren()[3] local propLightTemplate = script:GetCustomProperty("LightTemplate") local filaments = World.FindObjectByName("Filaments") local bulbPosition = filaments:GetWorldPosition() -- Rotate the switch and spawn a light -- when the player interacts with switchTrigger local function OnSwitchInteraction() switch:RotateTo(Rotation.New(0, 90, 0), .5, true) World.SpawnAsset(propLightTemplate, { position = bulbPosition }) end -- Connect our event to the trigger switchTrigger.interactedEvent:Connect(OnSwitchInteraction) -
Press Play and test out the script by interacting with the light.
 Excellent!
You've turned on the light. If you keep interacting with the light switch you'll notice it continually spawns lights, making the light bulb brighter and brighter. Which is fine if that's what you wanted (and you're not the one footing the electric bill) but we want to flip the switch back and turn off the light.
Turning the Switch Off
-
In order to turn the switch off again, we need to create a variable that keeps track of whether the switch is on or off.
As always, let's start with the variables:
local isLightOn = falseisLightOnis the name of the variable we'll use to keep track of the switch being on and off. Because we start with the switch off,falseis the starting state for the switch.
-
Next, we need to tell the script to set
isLightOntotrue, when we turn on the light. In theOnSwitchInteraction()function, type:isLightOn = not isLightOn- Instead of just setting
isLightOntotrue, this tells the script to changeisLightOnto whatever it is NOT set to. IfisLightOnisfalseit sets it totrue, and vice versa. In other words, the value is toggled to the state it is not currently at.
- Instead of just setting
-
Let's see if our script correctly toggles between
isLightOn = falseandisLightOn = truewhen the player interacts with the switch. Anywhere in ourOnSwitchInteractionfunction type:print(isLightOn)printtells the script to print to the Event Log window.isLightOnis the variable that will be printing.
It doesn't matter where in the function you typed this as we'll delete this later. Right now we only want to know if the switch is correctly toggling our
isLightOnvariable.Open up the Event Log tab from the View menu in the top bar. Keep this open and press Play. Interact with the switch. The Event Log should print
trueorfalseevery time you interact with the light switch. You can delete theprintstatement now.Now the script needs to know what to do specifically when the switch is on, and when it is not. We need an
ifstatement for this. In theOnSwitchInteractionfunction, afterisLightOn = not isLightOntype:if not isLightOn then end-
ifstatements are handy when you need a certain series of actions to happen when a certain set of conditions is true. Here is an example of how this might apply to a real life situation:if door == unlocked then Enter() end -
not isLightOnis the condition that must be met in order to execute the script inside our if statement. -
thensignifies the start of the code that will be performed if the conditions of theifstatement are met. -
endtells the script theifstatement is over.
Place the
switch:RotateTo()statement and theWorld.SpawnAsset()function inside of your newifstatement. YourOnSwitchInteraction()function should now look like this:local function OnSwitchInteraction() if not isLightOn then switch:RotateTo(Rotation.New(0, 90, 0), .5, true) World.SpawnAsset(propLightTemplate, { position = bulbPosition }) end isLightOn = not isLightOn end -
Press Play and make sure everything still works.
A light should have spawned every other time you interacted with the switch, instead of every time. The light is only spawning when we toggle
isLightOntofalse. Progress! -
The next step is to tell the script to turn the switch downwards when the light is off. To tell the switch how to rotate back to where it started, we need to know where it started in the first place.
At the top of your script where you have been typing all your variables, add this variable:
local switchStartingRotation = switch:GetRotation()Now that we have the variable set, under our
World.SpawnAssetfunction and betweenend, type:else switch:RotateTo(switchStartingRotation, 0.5, true)-
elseis used in anifstatement to tell the script if the if conditions are not true, do the following instead. To use our door example from before:if door == unlocked then Enter() else UnlockDoor() end -
switch:RotateTo()tells the script to rotate our switch variable. The switch needs to rotate to its original downwards position, since we defined its initial rotation asswitchStartingRotation, we can simply plugswitchStartingRotationinto our rotation statement. -
0.5is the time in seconds it takes to complete the action.
Your
OnSwitchInteraction()function should now look like this:local function OnSwitchInteraction() if not isLightOn then switch:RotateTo(Rotation.New(0, 90, 0), .5, true) World.SpawnAsset(propLightTemplate, { position = bulbPosition }) else switch:RotateTo(switchStartingRotation, 0.5, true) end isLightOn = not isLightOn end -
-
Press Play to see if your
elsestatement works. The switch should now rotate up when first interacted with, then down on your second interaction with it. However, we still need to de-spawn (delete) the light when the light switch is turned off.
Turning the Light Off
-
In order to turn off the light, you first need to define the light after it is spawned. When the LightTemplate is spawned, it shows up at the bottom of the Hierarchy. In your
elsestatement, after theRotateTo()line, type the following:local spawnedLight = World.FindObjectByName("Point Light")spawnedLightis the name we are giving to the light we have just spawned.World.FindObjectByName("Point Light")tells the script to search through the hierarchy until it finds the first object named "Point Light" which is part of theLightTemplatewe created."Point Light"is the name of our spawned light.
-
Now that you have defined our spawned light, you can tell the script to destroy it when the switch is turned off. Under the statement you just wrote, type:
spawnedLight:Destroy()spawnedLightis the variable we just defined representing the Point Light spawned when the light switch is turned on.Destroy()is a function used to delete objects from a scene.
Your
OnSwitchInteraction()function should now look like this:-- Rotate the switch and turn on and off the light -- when the player interacts with switchTrigger local function OnSwitchInteraction() if not isLightOn then switch:RotateTo(Rotation.New(0, 90, 0), .5, true) World.SpawnAsset(propLightTemplate, { position = bulbPosition }) else --- turn off the light switch:RotateTo(switchStartingRotation, 0.5, true) local spawnedLight = World.FindObjectByName("Point Light") spawnedLight:Destroy() end isLightOn = not isLightOn endNotice how I updated the comment describing what the
OnSwitchInteraction()function does, and added some additional comments in the function for further clarity. -
Let's test out the script. You can now turn on and off the switch and the light turns on and off with it.
Everything works as it should, huzzah!
Adding Interaction Labels
-
Right now, the light switch trigger simply says, "Interact". You can add more polish to a project by changing the interaction label to say something relevant to the trigger interaction.
Let's change the label to say "Turn Off" or "Turn On" depending on whether the light is on or off.
There are two ways to change a trigger's label, by going to the trigger's properties tab and simply editing the Interaction Label field, or with a script. Or both!
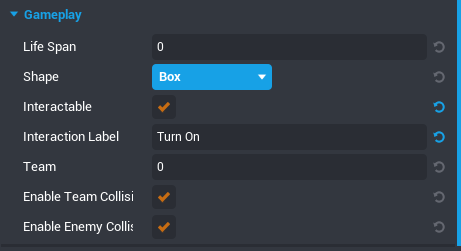
Editing the Interaction Field property is great for when your label will always say the same thing, no matter what. Because we want to create a label that changes based on whether the switch is already on or off, we'll use our script to update the label.
In your script, before the
OnSwitchInteraction()function, type:switchTrigger.interactionLabel = "Turn On"switchTriggeris the name of the trigger we are editing the label of.interactionLabelis the property of the trigger we are editing."Turn On"is a text string, basically what the label will say.=is an assignment, meaning we are setting a property to what comes afterwards
-
Press Play to see if the label changed from Interact to Turn On.
Now we just need to create a function that updates the label based on whether the light is on or off. Around your
interactionLabelstatement, add the following:-- Update light switch's label local function UpdateLabel() endYour entire
LightToggleScriptshould now look like this:local switch = script.parent local switchStartingRotation = switch:GetRotation() local switchTrigger = switch.parent:GetChildren()[3] local propLightTemplate = script:GetCustomProperty("LightTemplate") local filaments = World.FindObjectByName("Filaments") local bulbPosition = filaments:GetWorldPosition() local isLightOn = false -- Update light switch's label local function UpdateLabel() switchTrigger.interactionLabel = "Turn On" end -- Rotate the switch and turn on and off the light -- when the player interacts with switchTrigger local function OnSwitchInteraction() if not isLightOn then -- turn the light on switch:RotateTo(Rotation.New(0, 90, 0), .5, true) World.SpawnAsset(propLightTemplate, { position = bulbPosition }) else --- turn off the light switch:RotateTo(switchStartingRotation, 0.5, true) local spawnedLight = World.FindObjectByName("Point Light") spawnedLight:Destroy() end isLightOn = not isLightOn end -- Connect our event to the trigger switchTrigger.interactedEvent:Connect(OnSwitchInteraction) -
Press Play. Notice how the interaction label still doesn't change. This is because the line of code changing the label to Turn On is now in a function that isn't called on in the script. The script won't run the function until we tell it to. Right now we have only defined what the function does, but we haven't told the script when to run it.
-
Below your
switchTrigger.interactedEvent:Connect()line, add:UpdateLabel()Like this:
-- Connect our event to the trigger switchTrigger.interactedEvent:Connect(OnSwitchInteraction) UpdateLabel() -
Press Play. The label should now display Turn On again.
-
In order to change the label from "Turn On" to "Turn Off" based on if the light is on or not we'll need an
ifstatement. In theUpdateLabel()function write:if isLightOn == false then endif ... thenis the syntax needed for ourifstatement.isLightOn == falseis the condition that must be met in order to execute theifstatement.endmeans theifstatement is done.
-
If
isLightOnis set totrue, that means the light is off - so our interaction label should say Turn On. Cut and paste the interactionLabel line into thisifstatement. Now theUpdateLabel()function should look like this:local function UpdateLabel() if isLightOn == false then switchTrigger.interactionLabel = "Turn On" end endThe script still doesn't say what to do when the light is on. Let's add another
interactionLabelassignment that makes it say Turn Off and anelsecondition to ourifstatement. Under the Turn OninteractionLabelstatement and before theendline, type:else switchTrigger.interactionLabel = "Turn Off"Anytime
isLightOnis not equal tofalse, the label will say Turn Off. The whole function should look like this now:local function UpdateLabel() if isLightOn == false then switchTrigger.interactionLabel = "Turn On" else switchTrigger.interactionLabel = "Turn Off" end end -
Press Play to test it out.
The label still says Turn On even when the light is on. That is because the script only executes our
UpdateLabel()function once. It doesn't know to change the label when we interact with the switch. This can be solved simply by adding another call toUpdateLabel()to ourOnSwitchInteraction()function. -
Type
UpdateLabel()before theendof the function and after theifstatement within it. TheOnSwitchInteractionfunction should now look like:-- Rotate the switch and turn on and off the light -- when the player interacts with switchTrigger local function OnSwitchInteraction() if not isLightOn then -- turn the light on switch:RotateTo(Rotation.New(0, 90, 0), .5, true) World.SpawnAsset(propLightTemplate, { position = bulbPosition }) else --- turn off the light switch:RotateTo(switchStartingRotation, 0.5, true) local spawnedLight = World.FindObjectByName("Point Light") spawnedLight:Destroy() end isLightOn = not isLightOn UpdateLabel() end -
Press Play. Now the label should update every time you interact with the light switch. Woohoo!
Summary
You've now learned how a script can move and interact with objects within your scene using triggers and custom properties. You've also picked up a few programming concepts like functions and when to use if statements. Hopefully you feel a little more comfortable with coding and your next Lua project won't be so intimidating!
As a reference, here's how your full script should look like at the end:
local switch = script.parent
local switchStartingRotation = switch:GetRotation()
local switchTrigger = switch.parent:GetChildren()[3]
local propLightTemplate = script:GetCustomProperty("LightTemplate")
local filaments = World.FindObjectByName("Filaments")
local bulbPosition = filaments:GetWorldPosition()
local isLightOn = false
-- Update light switch's label
local function UpdateLabel()
if isLightOn == false then
switchTrigger.interactionLabel = "Turn On"
else
    switchTrigger.interactionLabel = "Turn Off"
end
end
-- Rotate the switch and turn on and off the light
-- when the player interacts with switchTrigger
local function OnSwitchInteraction()
    if not isLightOn then
        -- turn the light on
        switch:RotateTo(Rotation.New(0, 90, 0), .5, true)
        World.SpawnAsset(propLightTemplate, { position = bulbPosition })
    else
        --- turn off the light
        switch:RotateTo(switchStartingRotation, 0.5, true)
        local spawnedLight = World.FindObjectByName("Point Light")
        spawnedLight:Destroy()
    end
    isLightOn = not isLightOn
    UpdateLabel()
end
-- Connect our event to the trigger
switchTrigger.interactedEvent:Connect(OnSwitchInteraction)
UpdateLabel()
Was this page helpful? Can it be improved? Please let us know your feedback!