Environmental Art in Core

Overview
Learn how to use the Terrain Creator, swimmable volumes, and the Object Generator. This tutorial will focus on making a desert landscape with a hidden green oasis, but can be customize to build any natural scene with an area where players swim.
- Completion Time: 20 minutes
- Previous Knowledge: Introduction to the Core Editor
- Skills you will learn:
- Creating and sculpting terrain
- Creating swimmable volumes
- Using the Object Generator tool
The Terrain Creator
The Terrain Generator tool creates a different landscapes, either from a premade HeightMap, or through random generation.
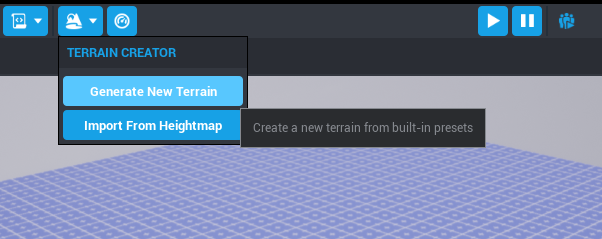
Open the Terrain Creator
- Start from an new empty project.
- Click the
 button to open the Terrain Creator.
 - Choose Generate New Terrain from the drop down menu.
Generate Terrain
There are different options for types of terrain that can be generated in Core. You can click any of the terrain types to see a description of what it will generate.
- Select Rolling Hills.
- Click Generate.
- Press
 or = to explore the newly generated terrain from a player perspective.

Rearrange the Scene
You may have fallen through your terrain, and you may see an unusually flat area where Default Floor still exists in the scene.
- Find the Spawn Point in the Hierarchy and move it too a new spot, above the terrain and just outside of the default floor.
- Right click on Default Floor in the Heirarchy and select Delete.
- Click the Terrain button again to see that it now lists the Terrain(Rolling Hills) as Primary
Tip: Primary Terrain is the terrain in your scene with collision enabled. You can have multiple terrains, but only one will have collision.
Apply Materials
Any material can be added to a terrain. However, materials that begin with "Terrain" are designed to be used for terrain and will have more variation in how they are applied.
- Open the Materials tab of Core Content.
- Test out different materials by dragging them onto the terrain.
- Search the Core Content tab for
terrain. - Find Terrain - Desert and drag it onto the terrain.

Open the Sculpt Menu
The shape of terrain can be changed using sculpting tools in the Properties menu.
- Click on the terrain, either in the Main Viewport or the Hierarchy.
- Open the Properties window.
- Click on the
 Sculpt tab.
Sculpt the Terrain
The sculpting menu contains tools to change the landscape according to the intended style.
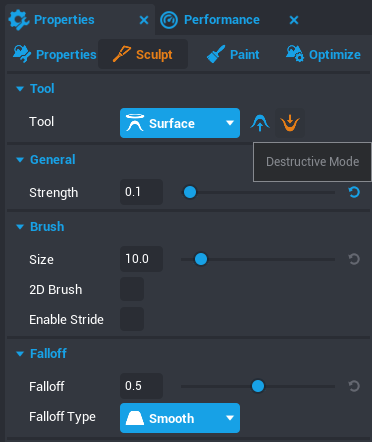
- In the Tool menu, select the
 Surface tool.
 - Change the mode from
 Additive to
  Destructive.
 - Lower the Strength value in the General subcategory to
0.1 - Click and drag on the terrain to make a crater deep enough to fill with water.

Smooth the Terrain
- Change the sculpting tool from Surface to
 Smooth.
 - Click and drag the crater to give it a more natural appearance.

Water and Swimming
Add a Cube to the Scene
- Search for a cube in the Core Content window.
- Drag the cube into the scene, in the middle of your crater.

Resize and Reposition the Cube
- Resize the cube until it fills your crater.
- Move the cube down until it looks like a pool of water inside the sand dunes.

Add a Material
- Search Core Content for
water. - Choose a water material, and drag it onto the cube.
- Preview the scene to see the water in person.

Note
Double-click Cube in the Hierarchy to rename it to Water to make it easier to navigate your project in the future.
Disable Collision on the Water
The water cube now has the appearance of water, but a player will walk over it, rather than into it, because the cube has collision by default.
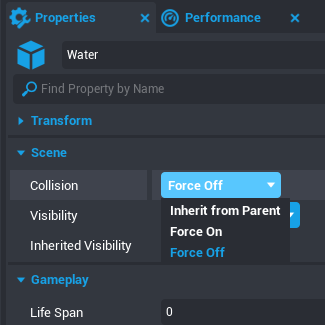
- Select the water cube.
- On the Properties window, and find the Scene section.
- Change the Collision property to Force Off.
- Preview again to test that you can now pass through the water as a player.
Use the Underwater Post Process
Now you can pass through the water, but once inside it looks like the volume disappears. We can use the Underwater Post Process volume to achieve an underwater effect.
- Find the Underwater Post Process volume under the Post Processing section of Core Content.
- Drag it into your scene on top of your water.

Resize the Underwater Post Process
Core makes it easy to copy properties from one object to another. We can use this to make the Underwater Post Process match the size and position of the Water cube.
- Select the cube that represents the water and open Properties window.
- Click the
 Copy Properties button in the top right corner.
 - Select the Underwater Post Process volume and return to the Properties window.
- Click the
 Paste Properties button, in the top right corner.
 - Check Position, Rotation and Scale in the menu that pops up and press Paste Selected Parameter Values
- Start a preview to test out swimming. The Underwater Post Process should now be in the same place and the same size as the water object.

Generating Foliage
The Object Generator is a way to take any object and let Core place several copies of on the terrain, according to customizable settings.
Duplicate the Water Object
To generate objects, you need both an object to generate, and another object in the scene for the objects to generate beneath. In this case, duplicating the water object is a fast way to define a region around the water where plants would spawn.
- Select the water object and press Ctrl + W to duplicate it.
- Drag the duplicate cube up above the terrain.

Select the Objects
To use the Object Generator, you need to select both the object to generate and the object in the scene for the objects to generate under before opening the Object Generator menu.

- In the Core Content tab open the 3D Objects menu to find the Nature menu.
- Select a grass object.
- Make sure that the duplicate water is also selected in the Hierarchy.
Tip: Templates you've created or downloaded from Community Content also work with the object generator!
Spawn Grass
- Open the Object Generator by going to the View in the menu top bar. by going to the View in the menu top bar.
- In the Object Generator menu, check the Randomize Scale box, and change the Max Scale value to two
- Randomize Scale makes the objects generated vary in size.
- Make the Min Scale and Max Scale values closer for less variation in size.
- Check the Randomize Yaw box.
- This will place the grasses at different angles relative to the ground
-
Check the Use Random Color Box, and change Min G to
0.5and Max B to0.- This will randomize the grasses color between yellow (100% red with 100% green) and 100% green with no red.
-
Check the Only Spawn On Terrain box to put grass on the sand, but not the water object.
- Change the Positional Randomness value to
3 - Click Spawn Selected Asset Under Selected Hierarchy Object.
Spawn More Desert Objects
Continue using the Object Generator to decorate your scene. Rocks, ferns, and other natural objects lend themselves to generation, this method can be used with any 3D object.
You have now built a natural environment that you can use as a basis for a game, or share with other users to incorporate into their games.
Learn More
Custom Materials | The Object Generator | Sharing Content
Was this page helpful? Can it be improved? Please let us know your feedback!