Collaboration & Source Control in Core
Overview
Working on projects with multiple people can get complicated. Now we live in the future, where source control exists.
Using a source control system, you are able to maintain a history of your projects and every change you ever made to them. You can save files and make changes to them over time. If you soon realize something went very wrong and everything is broken, you can revert back to an earlier and working version of your project. This can save months of time, with big or complex projects--or even for a solo project!
What even is Source Control?
Source control (or version control) is the practice of tracking and managing changes to code. Source control management (SCM) systems provide a running history of code development and help to resolve conflicts when merging contributions from multiple sources. Whichever SCM system you use really comes down to personal preference.
In this tutorial we'll teach you how to use Git, the most commonly used and recommended SCM solution, and how to leverage GitHub for hosting your repository.
- Completion Time: 10 minutes
- Knowledge Level: No prior knowledge required
- Skills you will learn:
- How to use Git with Core
Collaboration in Core Itself
If you're not too worried about making mistakes, or just want to share quick things, Core has many ways to share content already built-in.
If you're working with multiple people, instead of using "formal" source control, you could just publish templates to Community Content and have your teammates access what you make that way.
You can also publish your games privately, so that only people you give the link to can play and view it.
To read more about how to do this, check out the Templates tutorial. Both templates and games can be published privately, so that you can control who may access them.
This can quickly get hard to manage with large teams or complex games. Community Content fills up fast, and ensuring things actually work well together can be hard when they aren't made in the same project. This is why we have written this tutorial for you!
Tutorial
Setting up source control can sound intimidating if you've never done it before--but it's easier than it sounds!
Getting Started with Git
-
Go to GitHub.com and either log in or create a new account if you do not have one yet.
-
Create a New Project on GitHub. This is the same as "Create Repository" on GitHub, it just depends on which page you are on--both do the same thing.
Core's NDA
During Core's closed alpha, you must set the project to Private to maintain the Non-Disclosure Agreement.
-
Change any settings you might want; if you're starting from scratch you'll want to check the "Initialize this repository with a README" button.
Click "Create Repository" to finalize project creation.
-
Now you have a GitHub project repository! This is the web location where all your files will be saved each time you commit new changes to the project.
Next is connecting a Core project to GitHub by setting up the repository (often shortened to "repo") on your computer.
-
There are two ways to interact with Git. You could either use the console / command prompt or a graphical client, like GitHub Desktop.
For beginners, using GitHub Desktop can be much easier and we'll assume you are using it for the remainder of this tutorial.
Initializing the Repository
We first need to choose a location to clone the repository to, and this will work as you might expect--we're going to create it within the folder where your game is located.
For this reason, here are the recommended steps below:
-
Close Core before starting this process.
-
Create a new folder inside of your game's folder, like so:
C:\Users\User\Documents\My Games\Core\Saved\Maps\GameName\data\Note: "User" will be your Windows username, and you can name the last folder, called "data" in this case, whatever you want.
Why the extra folder?
Usually, all game files are directly in the folder with the project's name. However, due to the autosave feature in Core, a game with many saved revisions may experience a ~5-10 second delay to start up preview mode, as a large number of files are copied into the
.gitfolder from the autosave copies. We can avoid this by nesting the folders differently! -
Move all the game files into the
datafolder we just created. -
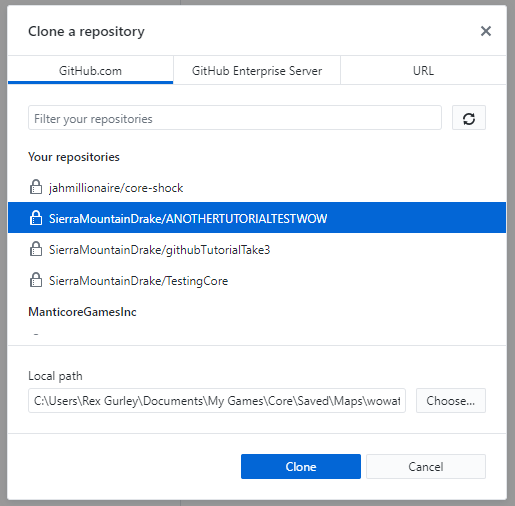
Open GitHub Desktop, and click File > Clone Repository to choose where to setup your project. First, click your new project from the Your repositories section. Navigate to your chosen game folder, in the same folder that the previous
datafolder is in. Clone your project into this game folder.
Now, your File Explorer should look like this, with whatever your project name is alongside the
datafolder:
-
Now, in your computer's File Explorer, drag the
datafolder into the Git folder you just made (it will be the name of your Git project). The file path should now look like:C:\Users\User\Documents\My Games\Core\Saved\Maps\GameName\GitHubProject\data\ -
Return to GitHub Desktop and you'll see a bunch of changes show up--Git has recognized all the new files we dragged in from the
datafolder!
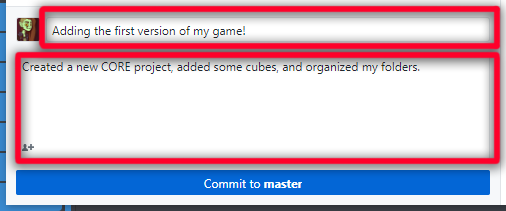
Add a commit message in the bottom left corner that describes what you did--something like "Adding the first version of my game!". You need to fill out both the smaller Summary box and the larger Description box to be able to submit your new commit. Confirm the changes to your project using the blue Commit button, and click "Push" in the top right of the window. Now your project is officially committed safely to GitHub!

-
Next time you make a change to the game within Core, Git will pick up the changed files for you. Each time you're done working or want to commit a big change, come back to GitHub Desktop and commit them with a clear message!
Congrats on getting set up, and happy committing!
Tips on Using Core with Git
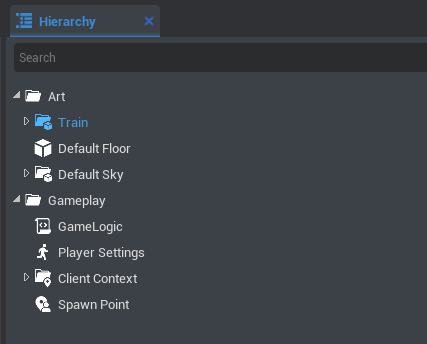
- A Core project will work best with Git when the project Hierarchy is very efficiently organized.
This usually means separating parts into different folders. For example, you might keep all the scripts and gameplay objects in one folder, and all art models in another separate folder.
With this split, you could have one team member work on scripting a game, while the other team member works on art. As long as they stay completely within their own Hierarchy folders, they will be able to work from their own computers and commit to the same project.
Here's an example of a project Hierarchy with that basic split of Art / Gameplay:

-
Even if you're not using GitHub Desktop, this whole process works the same way. The only catch you'll want to keep in mind is the use of a
datafolder to nest your game files one level deeper. -
Merge conflicts will only happen when two users edit the same file. So, as long as everything is split between different folders and these objects aren't referencing objects outside of their own folder in the project Hierarchy, you are good!
-
If you want, you can create a new project/repository directly within GitHub Desktop, rather than on the GitHub website.
-
This tutorial covers everything you need to get started! There are no other downloads necessary. You can manage your GitHub project using GitHub Desktop, or using the website GitHub.com itself.
Was this page helpful? Can it be improved? Please let us know your feedback!